SECURE LANE BUZZ BLOG
CEU
by Christine Richards on 03/22/18
| ||||||||||
|
Entrapment Protection from Miller Edge Video - Photo Eyes
by Christine Richards on 07/28/16
Watch the video here
Loop Goop is finally here and ready to ship!!!!
by Christine Richards on 05/26/15
 IT'S HERE!!!! Ready to ship out today. Our polyurethane saw-cut loop sealant is
available in both gray and black. The sealant provides a water-tight
seal when installing loops and works great with both asphalt and
concrete applications.
IT'S HERE!!!! Ready to ship out today. Our polyurethane saw-cut loop sealant is
available in both gray and black. The sealant provides a water-tight
seal when installing loops and works great with both asphalt and
concrete applications.
We
are thrilled to be able to offer you such a high quality loop sealant
at a reasonable price. Sealant is available by the tube, case (12
tubes), or pallet (36 cases).
$26.35 per tube (+ shipping)
$23.35 per tube (+ shipping when 12 or more is purchased on a single transaction
Each tube of sealant comes with a
modified sealant tip, applying loop sealant has never been easier. Fill
the groove in ONE pass from the bottom up! No more waiting around to
apply a second coat of sealant.
How do we ship the product to you?
by Christine Richards on 03/11/15
We ship heavy orders using an LTL carrier.
LTL is an acronym for Less than a Truck Load. LTL Carriers specialize in delivering products that are heavy or bulky. These types of products like Secure Lane offers are heavy and are packaged on to a wooden pallet, strapped and wrapped for protection against damage. A pallet of traffic spikes can weigh between 500 - 1500 lbs and sometimes more. The LTL carriers also offer lift gate delivery to your location. This lift gate equipped truck will bring the heavy pallet or pallets to the ground level for you. This service is helpful to those who do not have a fork lift or loading at the site in which they need the product delivered. Accessory charges would apply for this service. We determine the cost of freight using weight, size and product classification. Secure Lane always estimates this cost for you and is included on your written estimate. 
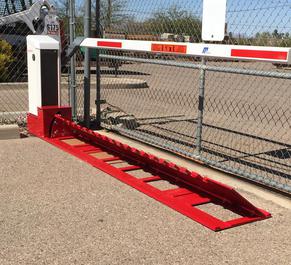
Wedge Barrier
by Christine Richards on 03/05/15Surface Mounted Wedge Barrier System, tough steel frame construction with a full featured gate barrier system with boom arm. The aggressive heavy-duty double-edged plate is engineered to meet an intruding vehicle directly, distributing the full force of the impact over the entire wedge and frame system
- Constructed from Heavy Duty Steel
- 120VAC operation
- Add a stop-go light! Comes pre-installed and synced.
- Integrates with all access control devices.
- Can be setup for a manned or unmanned facility
- Includes a Powder Coat Finish in Safety Red
- Optional Hot Dipped Galvanized
- Optional Safety Yellow Powder Coat Finish
- Weight: Approx. 815 lbs.
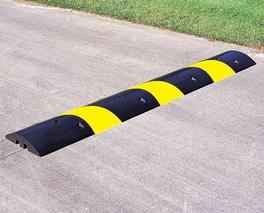
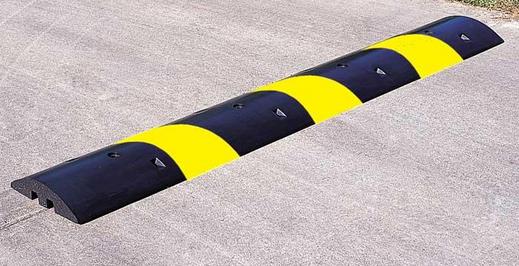
Why Buy Rubber Speed Bumps?
by Christine Richards on 02/19/15
Rubber speed bumps have several advantages over asphalt — price being first and foremost. Secure Lane has great pricing on speed bumps. Quantity discounts are huge! Call for your price (520)780-9751. If you have a parking lot or a long private road to your property, you may need multiple speed bumps, making a reasonably priced speed bump of particular importance.
Rubber speed bumps can be installed in less than an hour, so paying a contractor to do the job won’t mean saving up for decades. The speedbumps are straightforward to remove as well, so they can even be moved from place to place on an as-needed basis. Our rubber speed bumps have reflective surfaces and makes your traffic calming devices stand out from the road — essential at night.
- Our Speed Bumps and End Caps are made of 100% post-consumer recycled tire rubber from used car and truck tires. A 3% MD400 polyurethane is used as a binder.
- Speed Bumps have a 1/8” virgin rubber overlay resulting in a 92% recycled content. The yellow stripes are made from road marking tape. Optional cat eye reflectors are for nighttime visibility. There are 8 per 6’ speed bump, they are a highly reflective glass bead and have never been reported to come out.
- These 60 pound rubber speed bumps are light enough for easy installation by a single installer.
- Made in the USA. For each 12 lbs of product you buy saves one passenger tire from a landfill.
- Hardware installation holes are drilled with a ½” drill bit.
- Hardware available: 14” x 1/2” rebar spike with 5/8” washer for asphalt or gravel installations.
- 4 1/2” x ½” lag screw, washer and short shield for concrete installations.
- Use 10 ounce of epoxy or construction adhesive (ie; Polyurethane PL Premium) for installations where no hardware is allowed.
One Way Directional Traffic Control Spikes Installation and Safety Tips
by Christine Richards on 02/19/15
One Way Directional Traffic Control Spikes Installation and Safety Tips
Traffic control systems can greatly help protect your assets and property, however there can also be potential risks and liability concerns with their use. It is extremely important that proper safety measures are taken in the installation and use of a traffic spike system. Below are 12 recommended do's and don'ts of safe traffic spike system operation and installation to help you avoid mistakes that could result in an unsafe system. Following these tips can help ensure that no people or equipment are damaged from the traffic spike system.
Traffic Spike System Do's
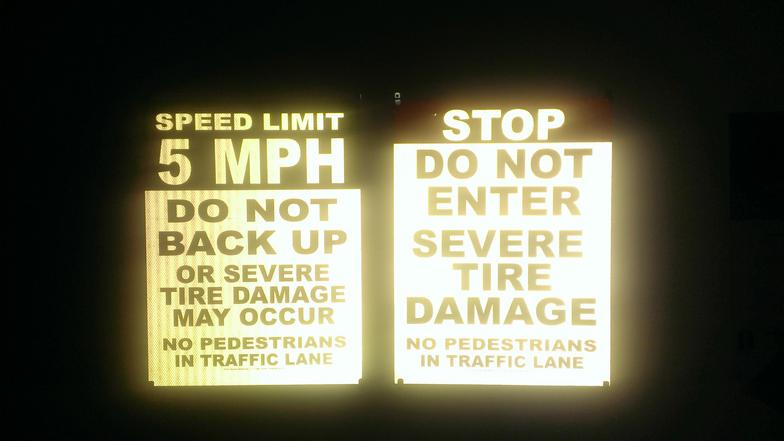
Do clearly warn pedestrians & drivers about the potential danger.
It is imperative that the area be clearly marked with at least a lighted or reflective warning sign. This is very recommended especially as it is required by law in many locations. Illumination of the traffic spike teeth, especially in areas with adjacent pedestrian traffic, is highly encouraged for an added level of safety. Remember, it's never a bad idea to have additional signs or pavement markings to increase the awareness of potential danger as well as reduce the property owners liability.
Do install in an area that has high visibility.
It's extremely important that traffic spike systems are installed in an area that is highly visible in order to ensure the safety of drivers. Traffic control systems should never be installed in blind spots, directly around corners, or halfway down a one way road. Pretty much anywhere a driver can not be properly forewarned of the potential danger to their vehicle.
Do consult experienced / trained professionals on the optimal placement of units, taking into account varying road widths.
The best layout for your property will depend on the width of the
traffic lane that the units will be installed on and the type of vehicles that will be crossing over spike controllers. Please contact us
(at 520-780-9751 or email at [email protected]) with
your site specifications so that we can recommend the best system for
your site.
Do add speed bumps before traffic controllers when extra speed control is desired.
Traffic needs to be slowed down to a maximum of 5 MPH when prior to crossing over the spike system. If use of the traffic controller does not automatically slow down traffic to this speed then it will be necessary to install a speed bump before the unit. Accidents, as well as extreme wear and tear on the unit is possible if traffic is not slowed down to the recommended 5 MPH speed.
Do make sure the traffic controller you choose is appropriate for the application.
Some facilities such as a hospital and emergency room, where people
are likely distracted and agitated, might not be an appropriate place to
install a traffic spike system. Traffic controllers should only be used
in a parking situation or other places where traffic can be slowed to a
maximum of 5 MPH prior to crossing over the unit. We do offer a pedestrian friendly spike system that is perfect for these types of facilities.
Do leave proper drainage channels below in-ground units.
It is important that you allow adequate drainage channels below in ground traffic controllers so that water will not gather beneath the unit during normal weather conditions. The placement area of an in-ground traffic spike system should be excavated 24-36 inches deep, depending on the annual rainfall of your area. Use cement blocks as a base, placed on top of crushed rock, to position the top plate of the traffic controller at a level flush with the pavement surface.
Do install in a way that traffic flows over spike teeth at a strict 90 degree angle.
Is it very important that traffic controllers are installed in such a manner that traffic flows over the teeth at a strict 90 degree angle (perpendicular to the teeth). Complete vehicle alignment and perpendicular passage over the controller must be assured for both the front and rear tires. Failure to follow this guideline will result in extreme wear and tear on your unit as well as the puncturing of tires or chipping when traveling in the correct/allowed direction over the teeth.
Traffic Spike System Don'ts
Don't install on a curve.
A traffic controller being installed on a curve does not allow enough
room before and after the unit for all vehicles to cross straight over
them. There must be enough straight roadway available before and after
the unit to allow vehicles that have just completed a turn or slope to
straighten out so they're exactly perpendicular to the teeth. Fifteen to
twenty feet of space in front of before the unit is a good rule of
thumb. Not following this guideline may severely damage your unit and
puncture the tires of traffic traveling in the correct direction over
the spikes. Click here to see an example.
Don't install on uneven surfaces
Surface mounted units must be installed on a level, even surface with no welts, bumps, or dips beneath them. In-ground units must be installed with a level drainage bed, when installed properly an in-ground unit will be completely level with the road surface.
Don't install on inappropriate road surfaces such as brick, gravel, or dirt.
Traffic spike controllers should only be installed on level concrete or asphalt roadway. Brick, dirt, gravel and other road surfaces are not appropriate installation surfaces. If you're installing the spike system in an area that has an inappropriate road surface, a level concrete pad should be laid at the point of installation, stretching at least 10 ft from the unit.
Don't install in an area that has a large amount of dirt, debris, or gravel.
If the area surrounding the installation has a lot of dirt, debris, or gravel, it is highly recommended that a concrete pad be installed at the point of installation and the immediately surrounding area to reduce the amount of materials getting inside the spike system.
Don't forget to properly maintain the unit.
In order to ensure your traffic controller has a long life of functioning properly, it is essential to be familiar with and to follow through with the maintenance requirements of the unit. Proper maintenance consists of periodic inspection and removal of leaves, dirt, gravel, or other materials that may have become lodged inside the unit. How often this needs to be done will depend on your geographic area and the conditions at your installation site.
Loop Sealant is back!!! Loop Goop with Flat Applicator Tip
by Christine Richards on 02/19/15

Available in BLACK and GREY
30 fl oz Tubes
12 Tubes per Case
Coverage Per Tube/Case
| 3/16" Wide Saw-Cut (Best Size) | ||
|---|---|---|
Depth |
Length per Tube |
Length per Case |
1 1/4" |
20ft |
240ft |
1 1/2" |
16ft |
192ft |
| 1/4" Wide Saw-Cut (25% Larger) | ||
|---|---|---|
Depth |
Length per Tube |
Length per Case |
1 1/4" |
15ft |
180ft |
1 1/2" |
12ft |
144ft |
Using a 3/16" wide blade over 1/4" blades will save you 25% in loop sealant.
To get the most out of your tube of Loop Goop use with a 3/16" wide saw blade, and BD Loops 3/16" Preformed Saw-Cut Loops.
Use a BD Loop Preformed Saw-Cut Loop and save up to 55 minutes in installation time per loop:

| 15 min | Preformed Loop - no wrapping wires in the field. |
| 10 min | Loop and lead-in fit in same size groove - No double cutting! |
| 10 min | No need to twist lead-in wires. |
| 5 min | No need to install backer-rod. |
| 15 min | Seal Loop in one pass from the bottom up with included 3/16" flat sealant tip! Pointed tips seal the groove from the top down and require 2-3 passes to fully seal the groove. |